Showing posts with label crate & barrell. Show all posts

4.26.2015

Midtown Miami Condo

View additional photos of this completed project at
http://www.houzz.com/projects/1067737
SHARE:

12.13.2013

working with :: radiant orchid

Last week, Pantone announced "Radiant Orchid" as the 2014 Color of the Year. The company, who is the world-wide authority on color, describes this year's selection as "an enchanting harmony of fuchsia, purple and pink undertones" that "inspires confident and emanates great joy, love and health."
This is a strong color and translates easily in the fashion and beauty industries. We're all comfortable seeing pink and purple tones in cocktail dresses and eye shadows...but how do you utilize this shade in your home? Just like any other color, I like to take inspiration from nature. Here are three directions to take:

:: from the sea ::
sea urchins
image courtesy of Steve Jurvetson
The orchid color is found in these sea urchin shells and is complemented with lighter pink, sandy tones and shades of white. Here are some Benjamin Moore colors that would be beautiful and I envision a lovely, restful sitting room with a moderately feminine feel:
Pink Raspberry is a slightly lighter shade and an excellent jumping off point. I'd pepper it throughout the room in the artwork, trims and accents.
Newborn Pink would be beautiful in luxurious silk pillows or maybe on a pair of slipper chairs.
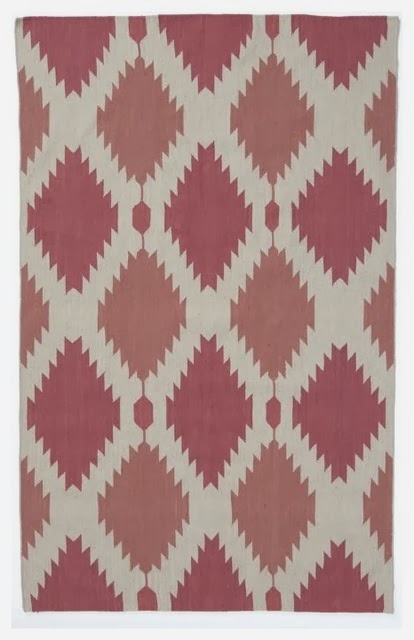
Used on the walls, April Pink is a pale shade that has brown undertones and would read as a neutral. Underfoot, I found a great pink ikat rug that blends the pink and orchid tones and introduces a modern pattern to the space.
Phoenix Wool Dhurrie 8X10 $384 (on sale!!) :: West Elm 
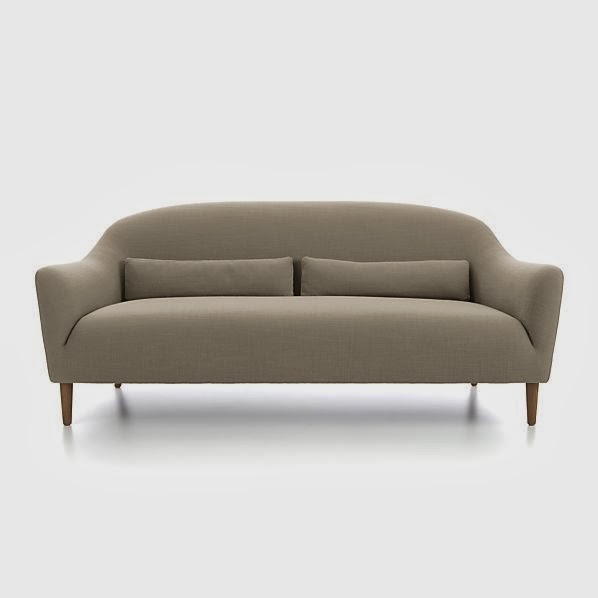
I loved the curvy, inviting shape of this sofa from Crate & Barrel and the linen color is the perfect for moderating all of the other pink tones.
Pennie Sofa in Linen color $899 :: Crate & Barrel
:: from the garden ::
orchids
image courtesy of ImagesBackgrounds
Acid green is the perfect counterpoint to this rich hue and balanced with heavy doses of white, I'm inspired to create a clean, modern dining room.
Go all in and saturate the walls with Pre-dawn Sky. I might even take it a little further and have it applied in a high-gloss lacquer like finish. Definitely dramatic, but why not??


The clear, bright tone of Hibiscus hits the mark as a great contrast to the orchid. This parsons dining table is a classic design that will forever be on my list of favorite furniture. The sleek white lacquered finish works well to give the eye a rest and helps make your table setting the star.
White Lacquered Parsons Dining Table $399 :: West Elm
Speaking of table settings, I think this green china from Martha Stewart for Wedgewood is a great accent and adds a little traditional design to this otherwise modern space.
Martha Stewart Moss Garland :: Martha Stewart Weddings
:: from the sky ::
stunning sunset
image courtesy of FineArt America
Breathtaking sunset like these with their saturated color combinations are often a source of inspiration. I'm taking this color story into the bedroom and using the orchid as an accent instead of the main event.
I love a restful color in a bedroom and Patriotic White provides a hint of blue that is calm and airy.
We all know how nicely rich browns, like Clinton Brown, and light blues work together, but you may not think to combine brown and fuchsia. However, the trio is really beautiful when used in the right proportions. I would use this deep brown in velvet on a settee, on the bedding and in a pattern on the drapes.
Crushed Berries is another excellent option when interpreting the "radiant orchid" trend. I would use it in fabric accents and maybe lacquer a side table to really bring out the richness. I'd love to see how you're planning to include this shade in your home...


SHARE:

12.11.2013

diy :: bubble chandelier

Wow! I just realized how long its been since my last post, but I promise I've been a busy bee. I hope you've been tracking our progress over on the #barnhouse blog... Here's a recent post of a fun DIY project that is a crowd favorite~

If you've taken a look at my Pinterest inspiration board, you may have seen this super adorable bubble chandelier by Pelle.
I thought it would be perfect for the third bedroom which serves as a little girl's room and doubles as a guest bedroom. Its whimsical and modern at the same time -- fun for a child without being too juvenile. I think the original was about $395 (completely reasonable knowing what it takes to produce a light fixture for resale), however that wasn't in the budget, so I did a little research. Turns out, CB2 sells glass balls in two sizes and they already have a little hole in them which is perfect for inserting the wire holders. Here's what I used:

  • five of the large glass balls ($3.95 each)
  • seven of the small glass balls ($1.95 each)
  • a white canopy kit from Home Depot ($7)
  • two packs of candelabra base keyless sockets ($4 each)
  • white lamp wire
  • two packs of 4" candle socket covers ($2 each)
  • one pack of four 40W candelabra base bulbs ($6)
  • cotton twine (I already had this)
  • paperclips
  • glue gun & glue sticks
I started by making the wire holders. The wire that I had was a little too light, so I used paperclips instead. The wire is stiff and also thin enough to get through the hole. You'll need to clip the paperclips with wire snips and use only the straight sections. Bend/twist the pieces to make a loop and then bend each end down so the ends of the wire won't scratch the glass.

Before inserting the wire in the hole, I tied the twine onto the clip. Slide the wire all the way into the hole and pull up so the holders catch.

My next step was to create four clusters of the glass balls and braid those together. As I created each cluster, I held them up and varied the lengths of the twine.

Now, I measured lengths of the white lamp wire. I made mine about 24" so that I could have plenty of slack to trim after I assembled the fixture. We have 10' ceilings, so I wanted the finished height of the chandelier to be about 18". Then I wired each socket. This is a fairly simple step (instructions are on the package and everywhere online), but if you're not sure, its a good idea to "phone a friend" here.

I added the wired sockets to each of the glass balls clusters, again varying the lengths. Then I wound the braided twine around and up the lamp cord, securing along the way with dots of hot glue. In the photo below, I have the bulb already screwed in. I need to add the extra step of the socket covers, which have to be trimmed and slipped on before the bulb is put in. I added another little detail (although in reality you can't see it after the chandelier is up) -- I wrapped about half of the socket cover in twine and continued it up the wire to meet the other twine braid.

I then gathered the four clusters together, adjusting the length along the way. The goal is to make it look effortlessly irregular -- kind of like creating the perfect messy up-do (that in reality takes 30 min and half a can of hairspray :))

Now the next step is where I needed some help (did I mention that thankfully my fiance is a master electrician??) . You'll need to wire the four lamp wires together and through the ceiling canopy kit. Again, there are instructions on the package and online. After it was all wired together, I needed to join the clusters together. I chose to braid lengths of twine together and then wind those up the lamp wires. You'll want to get this pretty tight, so I secured the four wires with floral wire, then wound the braided twine securing it along the way with dots of hot glue. I'll say, the braids on the original fixture are much neater than mine, but when its installed, you don't notice the irregularities quite so much.

This is my finished fixture and I'm thrilled with the results. It is also everyone's favorite -- even the men! The light sparkles through the clear glass balls and literally makes people smile the minute we flip the switch.

Follow my blog with Bloglovin
SHARE:

7.22.2013

Inspired :: The Florida Keys

This week, my son Jake (super adorable, all around great kid) is on a trip with a friend and his family to Stock Island in the Florida Keys. So as I sit here in soggy North Florida, excited for every peak of sunshine between thunderstorms, I find myself daydreaming about the blue skies, tropical breezes and vibrant atmosphere of the Keys.

Mangrove Beach in Biscayne National Park

Here's where my imagination takes me... I'd start with a comfortable, slightly modern sofa in a crisp, nearly white fabric. White? Absolutely! This is from Lee Industries' outdoor sofa line and is surprisingly practical and durable.

Oleander Sofa in Spinnaker Salt - Lee Industries :: Call for Pricing

Next, I'd add a couple of these mid-century modern chairs covered in a fun, saturated color. This design, reminiscent of the classic Jacobsen Egg Chair, is uber comfortable and covered in this hot orange upholstery, bring the vibrancy of the Keys into the room.
Paddington Lounge Chair - Dot & Bo :: $1,249.99
Then to bring a little of the outdoors in, I love this driftwood coffee table from Crate & Barrel. The wood is a wonderful, authentic color and looks a lot like pieces you may have picked up while strolling the beach.
Driftwood Coffee Table - Crate & Barrel :: $699

To counterbalance the rustic nature of the coffee table, I like the sleek design of these side tables from NotNeutral. They bring in a little more crisp white. Great beside the sofa, they keep the room light & airy and are tall enough to work with the higher arms on the sofa.

Tall Ribbon Table by notNeutral - 2Modern :: $270
And just because I LOVE pretty much any fabric from Quadrille, here are a few that would make great accents...
Potalla Multi - Allen Campbell :: To the Trade
Zig Zag in New Orange :: To the Trade
Island Ikat in Sky :: To the Trade
I tend to keep my accents simple, like this white octopus and floor lamp...

Stoneware Octopus - Dot & Bo :: $14.99


John Peacock Blue Floor Lamp - CB2 :: $99.95
And this original art giving us a hint of Key West style...

"Key West Turret" by John Schuller offered by fineartamerica.com :: Price Varies
I would likely paint the walls Super White and the ceilings an airy, sea blue. 
Fountain Spout (2059-70) by Benjamin Moore
P.S. Can't leave out the dining room! I love this dining table with a sunbleached-like finish surrounded by these modern dining chairs that remind me of coral...
Dakota Dining Table - Crate & Barrel :: $1,499
Tree of Life Chair - Dot & Bo :: $249.99


SHARE:
© Lemongrass Interiors | All rights reserved.
Blogger Template made by pipdig