12.17.2013

room by room :: guest/kids bathroom

While I'm putting the finishing touches on the boys' bedroom, I thought I'd share the design plan for the downstairs guest bath that is primarily used by the kiddos. Keeping that in mind, I wanted the bathroom to be #1 functional and easy to clean, #2 simple and classic and #3 gender neutral. One of our first choices was this vanity and sink combo from Ikea.
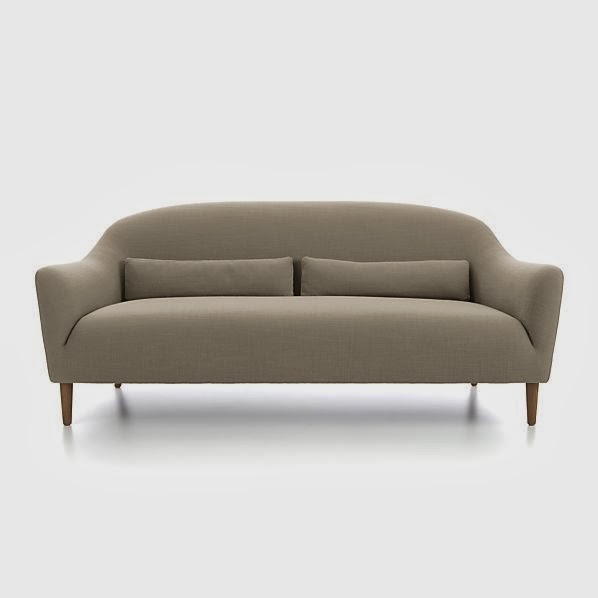
Hemnes + Rattviken Sink Cabinet $379 :: Ikea
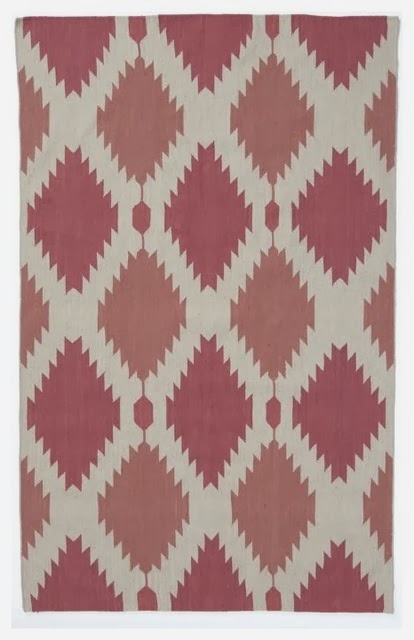
We spotted these vanities on a "idea gathering" trip early in construction and, individually, picked them out. Then when we were showing each other what we liked...we realized we'd chosen the same ones making these an easy choice. I was inspired by the color scheme and stripe design in this bathroom by Sarah Richardson (one of my favorite designers).
Classic Ensuite :: Sarah 101
In this design, she blended off-the-shelf tiles in white, cream and gray - a combo that I felt was neutral but not too boring and would give me flexibility with wall paint and accessories through the years. Now, to interpret that inspiration for our bath. First I chose the floor tile and grout color (which I also planned to use in the master bath).
American Olean 12-in x 12-in Sausalito White White Ceramic Mosaic Wall Tile (Actuals 12-in x 12-in)
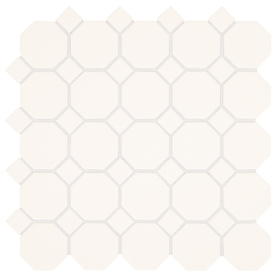
American Olean 12X12 White on White Hexagonal Tile $2.57/sf:: Lowe's
Polyblend Sanded Grout in Delorean Gray :: Home Depot
The photo of this grout is quite a bit darker than the actual product when it's dry. I thought the gray was a nice contrast to all of the classic white tile. I had already I painted the walls a very pretty light gray. 
We installed a white tub, deciding on ceramic tile for the shower surround. For this, I wanted a rectangular field (main) tile, but large rectangle tiles are muy expensive! So I searched and searched, configured and reconfigured...I finally settled on this 6X8 tile from Home Depot. In the end, the size turned out just right and the price was awesome!
U.S. Ceramics 6X8 Tile in Bright Snow $2.25 ft :: Home Depot
But of course, I wouldn't be happy with a plain white shower stall. So I broke out my trusty graph paper and designed a stripe pattern that would add some style, but hopefully not be too busy for the space. I found a gray 2X6 trim tile and penny rounds in an almond color.
Daltile Semi Gloss 6X2 Bullnose Ceramice Tile in Ice Gray $0.98/each :: Home Depot

Merola Tile Cosmo Penny Round in Almond (12X12 sheets) $6.97/each :: Home Depot
I decided on two accent stripes that consisted of a 4" band of the almond penny rounds sandwiched between two bands of the gray bullnose. I ordered the accent tiles without getting samples first, but when they arrived, I couldn't have been happier. The gray is almost a perfect match to the wall color and the penny rounds have several shades of cream and almond that give it really nice dimension.

**A little side note of serendipity here: When I was shopping for the gray ceramic tile, I took a chance and ordered the bullnose tiles which were less than a dollar each as opposed to $2.05 for the 1/2X6" flat liner (too thin anyway) or $1.98 for the 2X6" field tile. That was a huge savings! As it turns out, the thickness of the ceramic field & accent tiles is slightly more than the thickness of the penny rounds. So when installed, the curve of the bullnose rounded perfectly to the penny rounds. I'd like to say I planned that all out, but I just got super lucky!

I'm framing the last art prints now and installing a few accents. I'll post shots of the completed room soon!

BTdubbs...Only a week till Christmas Eve!! Heading out now for some last minute shopping, which is honestly, my favorite kind. I love working on a tight deadline! LOL 

Merry Christmas Peeps!


SHARE:

12.13.2013

working with :: radiant orchid

Last week, Pantone announced "Radiant Orchid" as the 2014 Color of the Year. The company, who is the world-wide authority on color, describes this year's selection as "an enchanting harmony of fuchsia, purple and pink undertones" that "inspires confident and emanates great joy, love and health."
This is a strong color and translates easily in the fashion and beauty industries. We're all comfortable seeing pink and purple tones in cocktail dresses and eye shadows...but how do you utilize this shade in your home? Just like any other color, I like to take inspiration from nature. Here are three directions to take:

:: from the sea ::
sea urchins
image courtesy of Steve Jurvetson
The orchid color is found in these sea urchin shells and is complemented with lighter pink, sandy tones and shades of white. Here are some Benjamin Moore colors that would be beautiful and I envision a lovely, restful sitting room with a moderately feminine feel:
Pink Raspberry is a slightly lighter shade and an excellent jumping off point. I'd pepper it throughout the room in the artwork, trims and accents.
Newborn Pink would be beautiful in luxurious silk pillows or maybe on a pair of slipper chairs.
Used on the walls, April Pink is a pale shade that has brown undertones and would read as a neutral. Underfoot, I found a great pink ikat rug that blends the pink and orchid tones and introduces a modern pattern to the space.
Phoenix Wool Dhurrie 8X10 $384 (on sale!!) :: West Elm 
I loved the curvy, inviting shape of this sofa from Crate & Barrel and the linen color is the perfect for moderating all of the other pink tones.
Pennie Sofa in Linen color $899 :: Crate & Barrel
:: from the garden ::
orchids
image courtesy of ImagesBackgrounds
Acid green is the perfect counterpoint to this rich hue and balanced with heavy doses of white, I'm inspired to create a clean, modern dining room.
Go all in and saturate the walls with Pre-dawn Sky. I might even take it a little further and have it applied in a high-gloss lacquer like finish. Definitely dramatic, but why not??


The clear, bright tone of Hibiscus hits the mark as a great contrast to the orchid. This parsons dining table is a classic design that will forever be on my list of favorite furniture. The sleek white lacquered finish works well to give the eye a rest and helps make your table setting the star.
White Lacquered Parsons Dining Table $399 :: West Elm
Speaking of table settings, I think this green china from Martha Stewart for Wedgewood is a great accent and adds a little traditional design to this otherwise modern space.
Martha Stewart Moss Garland :: Martha Stewart Weddings
:: from the sky ::
stunning sunset
image courtesy of FineArt America
Breathtaking sunset like these with their saturated color combinations are often a source of inspiration. I'm taking this color story into the bedroom and using the orchid as an accent instead of the main event.
I love a restful color in a bedroom and Patriotic White provides a hint of blue that is calm and airy.
We all know how nicely rich browns, like Clinton Brown, and light blues work together, but you may not think to combine brown and fuchsia. However, the trio is really beautiful when used in the right proportions. I would use this deep brown in velvet on a settee, on the bedding and in a pattern on the drapes.
Crushed Berries is another excellent option when interpreting the "radiant orchid" trend. I would use it in fabric accents and maybe lacquer a side table to really bring out the richness. I'd love to see how you're planning to include this shade in your home...


SHARE:

12.11.2013

diy :: bubble chandelier

Wow! I just realized how long its been since my last post, but I promise I've been a busy bee. I hope you've been tracking our progress over on the #barnhouse blog... Here's a recent post of a fun DIY project that is a crowd favorite~

If you've taken a look at my Pinterest inspiration board, you may have seen this super adorable bubble chandelier by Pelle.
I thought it would be perfect for the third bedroom which serves as a little girl's room and doubles as a guest bedroom. Its whimsical and modern at the same time -- fun for a child without being too juvenile. I think the original was about $395 (completely reasonable knowing what it takes to produce a light fixture for resale), however that wasn't in the budget, so I did a little research. Turns out, CB2 sells glass balls in two sizes and they already have a little hole in them which is perfect for inserting the wire holders. Here's what I used:

  • five of the large glass balls ($3.95 each)
  • seven of the small glass balls ($1.95 each)
  • a white canopy kit from Home Depot ($7)
  • two packs of candelabra base keyless sockets ($4 each)
  • white lamp wire
  • two packs of 4" candle socket covers ($2 each)
  • one pack of four 40W candelabra base bulbs ($6)
  • cotton twine (I already had this)
  • paperclips
  • glue gun & glue sticks
I started by making the wire holders. The wire that I had was a little too light, so I used paperclips instead. The wire is stiff and also thin enough to get through the hole. You'll need to clip the paperclips with wire snips and use only the straight sections. Bend/twist the pieces to make a loop and then bend each end down so the ends of the wire won't scratch the glass.

Before inserting the wire in the hole, I tied the twine onto the clip. Slide the wire all the way into the hole and pull up so the holders catch.

My next step was to create four clusters of the glass balls and braid those together. As I created each cluster, I held them up and varied the lengths of the twine.

Now, I measured lengths of the white lamp wire. I made mine about 24" so that I could have plenty of slack to trim after I assembled the fixture. We have 10' ceilings, so I wanted the finished height of the chandelier to be about 18". Then I wired each socket. This is a fairly simple step (instructions are on the package and everywhere online), but if you're not sure, its a good idea to "phone a friend" here.

I added the wired sockets to each of the glass balls clusters, again varying the lengths. Then I wound the braided twine around and up the lamp cord, securing along the way with dots of hot glue. In the photo below, I have the bulb already screwed in. I need to add the extra step of the socket covers, which have to be trimmed and slipped on before the bulb is put in. I added another little detail (although in reality you can't see it after the chandelier is up) -- I wrapped about half of the socket cover in twine and continued it up the wire to meet the other twine braid.

I then gathered the four clusters together, adjusting the length along the way. The goal is to make it look effortlessly irregular -- kind of like creating the perfect messy up-do (that in reality takes 30 min and half a can of hairspray :))

Now the next step is where I needed some help (did I mention that thankfully my fiance is a master electrician??) . You'll need to wire the four lamp wires together and through the ceiling canopy kit. Again, there are instructions on the package and online. After it was all wired together, I needed to join the clusters together. I chose to braid lengths of twine together and then wind those up the lamp wires. You'll want to get this pretty tight, so I secured the four wires with floral wire, then wound the braided twine securing it along the way with dots of hot glue. I'll say, the braids on the original fixture are much neater than mine, but when its installed, you don't notice the irregularities quite so much.

This is my finished fixture and I'm thrilled with the results. It is also everyone's favorite -- even the men! The light sparkles through the clear glass balls and literally makes people smile the minute we flip the switch.

Follow my blog with Bloglovin
SHARE:

room by room :: boys' bedroom

Before we even broke ground, I started gathering ideas and created a design board for each room. Often, my inspiration is sparked by a fabric that I find (or have in my stash). For the boys' bedroom, I started with an awesome orange slubby linen that I had left over from a previous job, some art and accessories gathered over time and this very cool bed that I found on Pinterest.
The style of this bed was perfect for the "streamlined rustic" look I was trying to achieve. I knew it was a DIY project I could easily tackle and I loved the idea that each boy would have his own reading light.
I had about 3 yards of this slubby linen in a great orange color that I used as the jumping off point for the accent color used throughout the room.
After deciding on the accent color, I pulled the rest of the color scheme together with neutrals that were a variation of the basic khaki and black. I wanted the walls and bed color to have an olive tone and the black to be a softer iron color, kind of charcoal. I chose Benjamin Moore's Camouflage for the walls, Creekside Green for the beds and Raccoon Fur for the chest of drawers & nightstands. Then for painted items in the accent color, I used Orange Blossom.
Both boys love hunting and fishing so I ran with that. Some of the accents I planned to use were a vintage Winchester poster, a group of fish prints in simple frames, a couple of unfinished wooden boat oars that I found at a local marine supply store for $19 each and this "warehouse" style pendant from Home Depot that was a great bargain!

Hampton Bay 1-Light Warehouse Pendant $29.88 :: Home Depot
While I loved the style, the brushed nickel finish didn't quite jive with the rest of the room. So I broke out every DIYer's best friend...spray paint. A quick once-over with steel wool to rough up the surface and a couple of coats of Rust-Oleum's Soft Iron spray paint and it was perfect.
Furniture for the room consisted of the beds (I constructed two queens for this room), a nightstand that just needed a color change, a desk and two Tarva chests from Ikea for just $99 each! These have clean lines, are solid pine and are so versatile (there are tons of hacks all over the web). They were also the perfect size for the space and made it possible for each boy to have his own.
Tarva Chest with 5 Drawers $99 each :: Ikea
 As for bedding, I found these great blankets at Target from their Threshold line in a gray pickstick.
Queen Threshold Organic Blanket in Gray Pickstitch $38.99 each :: Target
I had also previously scored a clearance deal on two striped throws from West Elm. I think I bought them before we even had walls, but a deal is a deal... and they had the exact colors and feel that I wanted for the room. For the window treatments, I've sewn simple roman shades in white cotton duck fabric with the soft iron color as an accent. 

In my next post, I'll show you the completed room and how its all come together...

Follow my blog with Bloglovin

C7JF48J76TDK
SHARE:

12.05.2013

catching up + diy bubble chandelier

So its been about six weeks since my last post and in that time, we've finished the house and moved in. Just a week and a half later, we hosted Thanksgiving for nearly 40 people!  Now its time to hit rewind and catch up on all of the dilemmas, decisions and details that resulted in a home we truly love...

If you took a look at my Pinterest inspiration board, you may have seen this super adorable bubble chandelier by Pelle.
I thought it would be perfect for the third bedroom which serves as a little girl's room and doubles as a guest bedroom. Its whimsical and modern at the same time -- fun for a child without being too juvenile. I think the original was about $395 (completely reasonable knowing what it takes to produce a light fixture for resale), however that wasn't in the budget, so I did a little research. Turns out, CB2 sells glass balls in two sizes and they already have a little hole in them which is perfect for inserting the wire holders. Here's what I used:

  • five of the large glass balls ($3.95 each)
  • seven of the small glass balls ($1.95 each)
  • a white canopy kit from Home Depot ($7)
  • two packs of candelabra base keyless sockets ($4 each)
  • white lamp wire
  • two packs of 4" candle socket covers ($2 each)
  • one pack of four 40W candelabra base bulbs ($6)
  • cotton twine (I already had this)
  • paperclips
  • glue gun & glue sticks
I started by making the wire holders. The wire that I had was a little too light, so I used paperclips instead. The wire is stiff and also thin enough to get through the hole. You'll need to clip the paperclips with wire snips and use only the straight sections. Bend/twist the pieces to make a loop and then bend each end down so the ends of the wire won't scratch the glass.

Before inserting the wire in the hole, I tied the twine onto the clip. Slide the wire all the way into the hole and pull up so the holders catch.

My next step was to create four clusters of the glass balls and braid those together. As I created each cluster, I held them up and varied the lengths of the twine.

Now, I measured lengths of the white lamp wire. I made mine about 24" so that I could have plenty of slack to trim after I assembled the fixture. We have 10' ceilings, so I wanted the finished height of the chandelier to be about 18". Then I wired each socket. This is a fairly simple step (instructions are on the package and everywhere online), but if you're not sure, its a good idea to "phone a friend" here.

I added the wired sockets to each of the glass balls clusters, again varying the lengths. Then I wound the braided twine around and up the lamp cord, securing along the way with dots of hot glue. In the photo below, I have the bulb already screwed in. I need to add the extra step of the socket covers, which have to be trimmed and slipped on before the bulb is put in. I added another little detail (although in reality you can't see it after the chandelier is up) -- I wrapped about half of the socket cover in twine and continued it up the wire to meet the other twine braid.

I then gathered the four clusters together, adjusting the length along the way. The goal is to make it look effortlessly irregular -- kind of like creating the perfect messy up-do (that in reality takes 30 min and half a can of hairspray :))

Now the next step is where I needed some help (did I mention that thankfully my fiance is a master electrician??) . You'll need to wire the four lamp wires together and through the ceiling canopy kit. Again, there are instructions on the package and online. After it was all wired together, I needed to join the clusters together. I chose to braid lengths of twine together and then wind those up the lamp wires. You'll want to get this pretty tight, so I secured the four wires with floral wire, then wound the braided twine securing it along the way with dots of hot glue. I'll say, the braids on the original fixture are much neater than mine, but when its installed, you don't notice the irregularities quite so much.

This is my finished fixture and I'm thrilled with the results. It is also everyone's favorite -- even the men! The light sparkles through the clear glass balls and literally makes people smile the minute we flip the switch.


SHARE:
© Lemongrass Interiors | All rights reserved.
Blogger Template made by pipdig